The world of Wemos D1 Mini Boards
Some readers recently asked me about the Wemos D1 mini usage in my projects and how this board can be used with ESPHome.
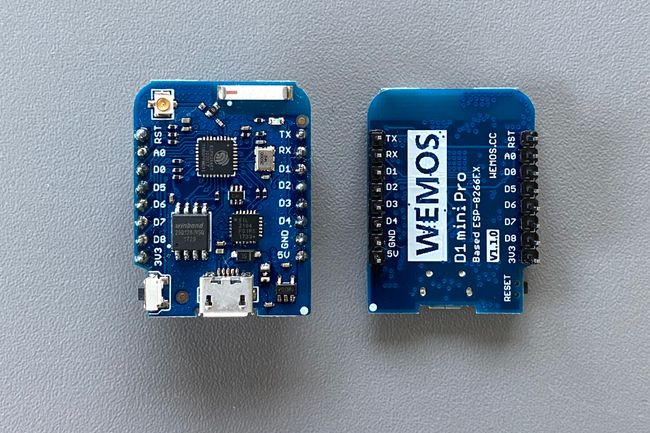
For most of my Arduino & ESPHome projects I use a Wemos D1 mini (v3.1.0) or Wemos D1 mini Pro (v1.1.0) and recently the Wemos D1 mini v4.0. The fourth board of the family is the is the D1 mini light. I never used one of the light versions, most of the time you can get the D1 mini & D1 mini pro for almost identical prices at alipexpress.com.
The boards are equipped with a ESP-8266EX chip running at 80 or 160MHz, like many other Node MCU boards. They provide 12 I/O pins - 11 digital and 1 analog input pin - enough for the most projects.
I also like the board because it is little smaller than a classic Node MCU board. The dimensions are 34.2 mm x 25.6mm. It is so small; it even fits into a small dollhouse Mini TV.
Wemos recently upgraded both boards. The Wemos D1 mini is now on version 4.0.0 and the Wemos D1 mini Pro on v2.0.0. Both boards got USB type C connectors instead of micro USB. The pro version also got a lithium battery interface charging interface and a LOLIN I2C Port. To fit everything on the board D1 mini Pro has grown a bit.
Pinout
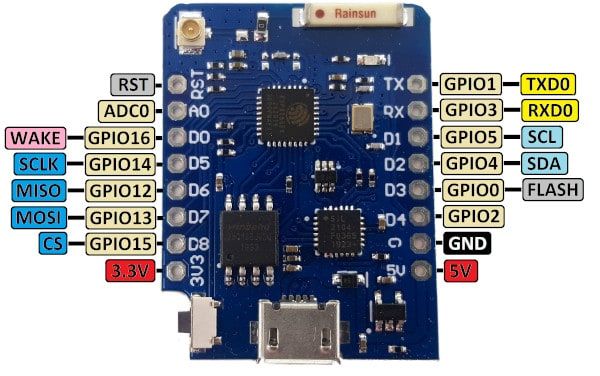
#The pinouts of the D1 mini and the D1 mini Pro are identical, also the D1 mini shares the same pin layout. And with the latest board versions of the D1 mini (v4.0.0) vs. D1 mini Pro (v2.0.0) Wemos keeps the pin layout compatible.

| Pin | Function | ESP-8266 Pin |
|---|---|---|
| TX | TXD | TXD |
| RX | RXD | RXD |
| A0 | Analog input, max 3.2V | A0 |
| D0 | IO | GPIO16 |
| D1 | IO, SCL | GPIO5 |
| D2 | IO, SDA | GPIO4 |
| D3 | IO, 10k Pull-up | GPIO0 |
| D4 | IO, 10k Pull-up, BUILTIN_LED | GPIO2 |
| D5 | IO, SCK | GPIO14 |
| D6 | IO, MISO | GPIO12 |
| D7 | IO, MOSI | GPIO13 |
| D8 | IO, 10k Pull-down, SS | GPIO15 |
| G | Ground | GND |
| 5V | 5V | – |
| 3V3 | 3.3V | 3.3V |
| RST | Reset | RST |
Important: all of the IO pins run at 3.3V.
Source: https://www.wemos.cc
D1 mini vs. D1 mini Pro
#The most obvious visible difference between the two boards is the color. In previous versions all boards used a blue PCB, but with the latest release the Pro version got a green PCB.
While the board shares the same pinout, USB-C connector and the LOLIN I2C Port they have a few technical differences. One is the ceramic antenna and the external antenna connector on the board. With the ceramic antenna the D1 mini Pro should have better WiFi reception than its little brother. The Pro board also comes with an external antenna connector to connect a U.FL connector compatible with 2.4GHz Wi-Fi antennas. Projects using the Pro board can also be powered with lithium batteries. The board includes a charging interface with 500mA Max charging current. Another difference is the flash memory size. In comparison, the D1 mini Pro has 16 MBytes of flash memory whereas the D1 mini only has 4 MBytes.
Depending on the projects you build these differences matter for now. It was perfectly fine to use the D1 mini for most of the projects I built.
D1 mini compatible shields
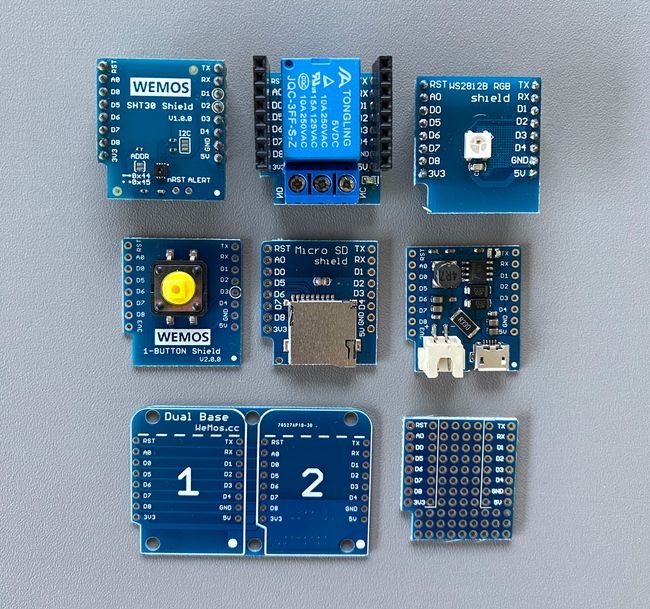
#Wemos provides a wide range of pre-build extension shields for the D1 minis. There is a wide range of LED, OLED, TFT and ePager display boards for interactive projects.
Various types of environmental sensors are available. You can choose from simple temperature & humidity sensors, air quality sensors or a standard PIR sensor. Next to the sensor shields Wemos also has a selection of motor driver shields for different areas of applications.
If you can’t find a suitable shield for your project, Wemos offers so-called base shields. These are empty prototyping boards for your DIY projects. They are available in different form factors (1x, 2x & 3x) and can also be used to stack other shields.

All shield boards typically come with male and female pins are already included in the package. A full list of official shields can be found on the Wemos Wiki.
ESPHome & the D1 mini boards
#ESPHome works on top of PlatformIO which has support for a wide range of ESP8266, ESP32 and various other development boards. Wemos D1 boars are supported as well, to use them in your ESPHome projects use:
esphome:
  platform: ESP8266
  board: d1_mini

---- or ----

esphome:
  platform: ESP8266
  board: d1_mini_pro
Or use the short form:
esp8266:
 board: d1_mini_pro
I recommend to always use the Wemos specific board name instead of a generic esp board or board: nodemcuv2. While these might work as well the pin mapping might be mixed up and you will get unexpected behaviour.
