Going Green: SolarEdge & Home Assistant
Home Assistant is an open-source home automation platform that allows you to connect and control all the devices in your home. It supports a wide range of solar inverters like Fronius, SMA Solar, Solar-Log, GoodWe or SolarEdge. And while SolarEdge already provides an extensive monitoring portal for end users, there are still some reasons to integrate with Home Assistant. Home Assistant lets you design cross-system dashboards or automations that leave the proprietary islands of manufacturers. For example, we can start charging our electric car when we have enough solar power left. This is more cost effective than sending it back to the grid.
In this blog post, we will take a look at how to integrate a SolarEdge inverter with Home Assistant. We will use the out of the box SolarEdge integration and the SolarEdge Modbus integration. It ties directly to the first two posts about our solar installation and our own green energy production.
Two Integration Options
#We have two options to get the data from our SolarEdge system into Home Assistant.
- Using the built-in, out of the box SolarEdge integration
- Via the SolarEdge Modbus custom integration
Installation of 1) is way simpler and pretty straightforward. The inverter data is loaded from the SolarEdge monitoring portal, not via the inverter directly. This will only provide you with the data SolarEdge provides via its cloud APIs and it will also be delayed.
With the custom integration - option 2) - you’ll get more data and technical details, maybe more than you even need. As the data is retrieved directly from the inverter, it is almost as real-time as possible. However the setup of the custom component code requires some inverter config changes (in most cases) and the installation is a little more effort.
If you plan to use the Home Assistant energy dashboard I recommend option 2.
Integrating SolarEdge via the cloud integration
#Integrating your SolarEdge inverter with Home Assistant is a straightforward process. This chapter describes how this can be achieved using the out of the box SolarEdge cloud integration which gets the data from the SolarEdge portal. The integration will update the site overview every 15 minutes. This is due to API request limits of the SolarEdge cloud API.
Here are the steps:
Step 1: Obtain your SolarEdge API Key
#The first thing you need to do is obtain your SolarEdge API key. To do this, go to the SolarEdge monitoring website and log in to your account. Then navigate to “Admin” > “API Access” page, where you will find your Site ID and the API key. You will need to accept the terms and conditions if this is the first time.
Step 2: Install the SolarEdge Integration
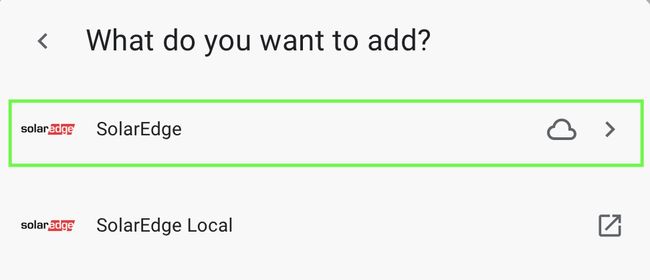
#The next step is to install the SolarEdge integration in Home Assistant. This can be done via the “Settings” page in Home Assistant. From there select “Devices & Services” and then click on the “+ Add Integration” button in the bottom right corner. In the dialog search for “SolarEdge”. You will see two options. Select “SolarEdge” with the cloud symbol.
Step 3: Configure the Integration
#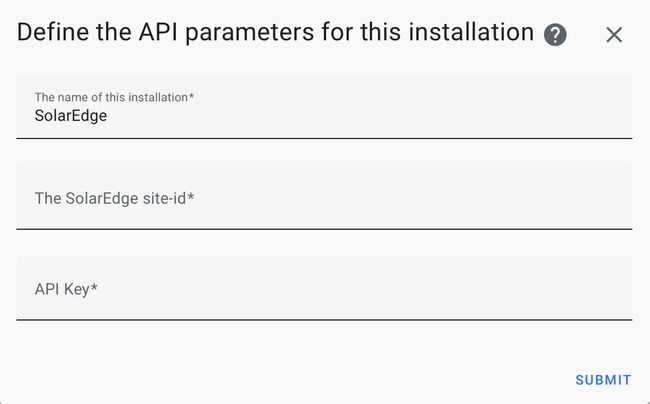
On the SolarEdge integration configuration screen, enter your SolarEdge Site ID and API key from Step 1. Once done click on “Submit.” Home Assistant will then automatically discover your SolarEdge inverter via the SolarEdge monitoring portal, add it to your Home Assistant dashboard and configure the sensors.
You are now ready to display the data in your custom dashboards or use them for the energy dashboard.
Integrating SolarEdge Inverter using Modbus
#The SolarEdge Modbus integration is an alternative way to integrate your SolarEdge inverter with Home Assistant. It can be used as a replacement for the default SolarEdge cloud-based integration or in combination. Instead of retrieving aggregated data from the SolarEdge monitoring portal this method uses the Modbus TCP protocol to communicate directly with the inverter.
Here’s what you need to do:
Step 1: Enable Modbus TCP on Your SolarEdge Inverter
#Your inverter must have Modbus TCP enabled. For some inverters you can do it yourself, for others you need an electrician. This depends on the inverter model.
In my case (using SE7K-RWS inverter) is was necessary to set the inverter into installation mode and connect directly to the inverter WiFi. Modbus TCP can be enabled in the “Site Communication” menu. This can be done via the SolarEdge SetApp or via a browser. These steps should be similar for most SolarEdge inverters of the current generation. If you are unsure ask your local solar installer or electrician.
Step 2: Configure the SolarEdge Modbus Integration
#The SolarEdge Modbus integration is available as a customer integration. You can installed it via HACS - search for “SolarEdge” - or manually. See instructions on the projects Git repository.
After installation make sure you reboot your Home-Assistant system.
Step 3: Connect the Modbus Integration with the Inverter
#On the SolarEdge Modbus integration configuration screen, enter the IP address and port number of your SolarEdge inverter, and click on “Submit.” Home Assistant will then automatically discover your SolarEdge inverter and add it to your Home Assistant dashboard.
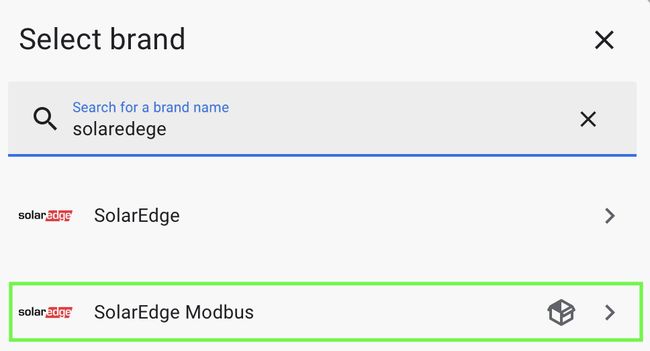
Like many other integrations the SolarEdge Modbus integration is installed via the Home Assistant UI. Then navigate to the “Settings” page in Home Assistant. From there select “Devices & Services” and then click on the “+ Add Integration” button in the bottom right corner. In the dialog search for “SolarEdge” and choose “SolarEdge Modbus”. The open box icon indicates that the SolarEdge Modbus integration is a custom integration.
Step 4: Configure the Integration
#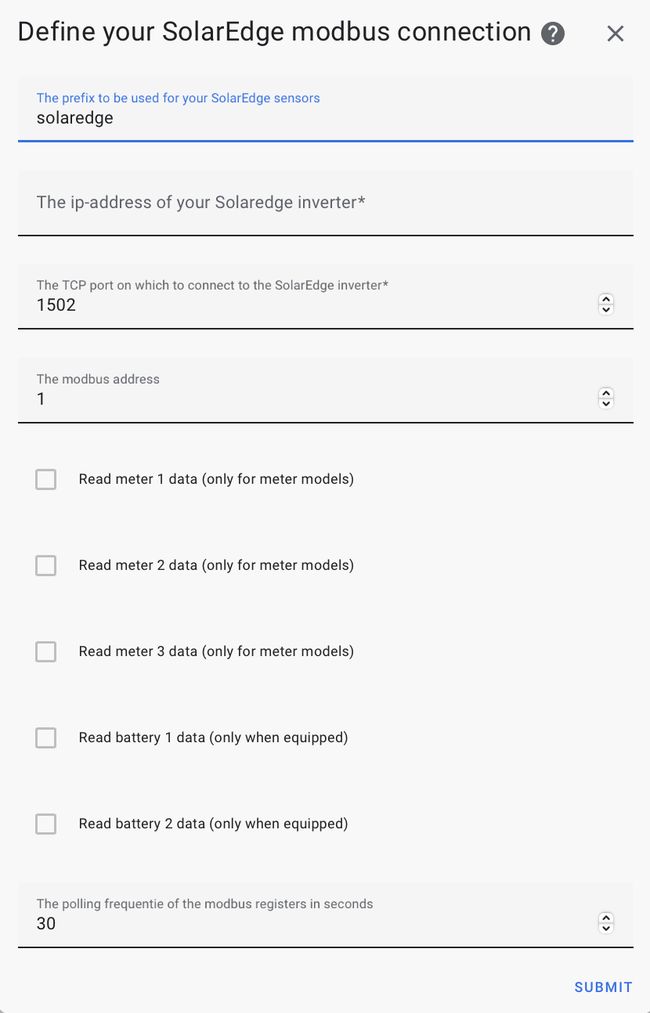
In the configuration dialog enter the local IP address of your inverter. The TCP port should stay at 1502 and in most cases the Modbus address must stay at 1 as well. This depends a little bit on your setup, if multiple inverters are used etc. Select the “Read …” checkboxes for the meters (up to 3) and batteries (up to 2) you would like to get data for. The integration automatically creates all sensor entities for the meters and batteries.
The SolarEdge Modbus integration can provide very detailed data from the inverter. The integration created 107 sensors for our installation. Not all of them are needed by us. For example, since we have a 3 phase system, I disabled most of the sensors with separate details data for a single phase as I’m only interested in combined data.
Home Assistent Energy Dashboard
#While SolarEdge offers a very comprehensive energy monitoring portal it is still a smart idea to set up the Home Assistant Energy Dashboard. The Home Assistant Energy Dashboard provides a more detailed overview of the energy usage of individual consumers. It also provides access to historical data, allowing users to track trends and make informed decisions about their energy usage. Furthermore, it helps you identify your home’s energy-hogging appliances and devices. Once you know which devices are using the most energy, you can take steps to reduce their usage or replace them with more energy-efficient alternatives.
To get the most out of it I highly recommend configuring the SolarEdge Modbus integration as this provides more data points, especially if your inverter has battery storage connected as well.
To setup the Home Assistant Energy Dashboard three sensors are needed - the energy values for solar production, grid consumption and exported energy. If you have battery storage installed you have the option to configure battery in and out aka. charge and discharge energy sensors.
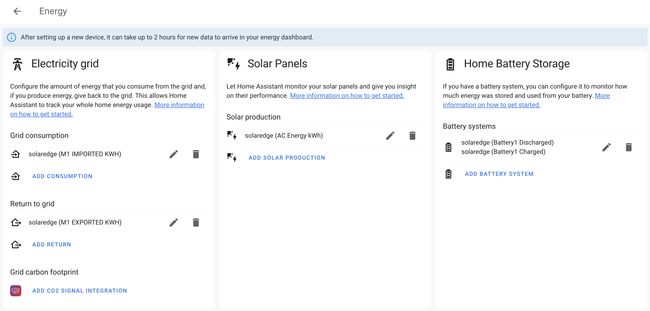
In the “Individual devices” section you can add all devices which provide energy consumption data like washing machines, fridges, wallboxes, lamps etc. If your devices don’t provide energy consumption sensors a smart plug can be used.
Make sure the energy sensors are not excluded if you have a customized recorder configuration in Home Assistant. Only sensors with history recording can be used in the energy dashboard.
If you live in Europe I recommend setting up the Forecast.Solar integration as well, in addition to the inverter and device energy sensors. Based on historical averages and weather forecasts, it can forecast solar power production for your solar panel system. Currently Forecast.Solar only works in Europe. I’m not sure if there is an equivalent service for other regions.
Once configured Home Assistant requires some time to collect enough data until the Home Assistant Energy Dashboard is fully working.
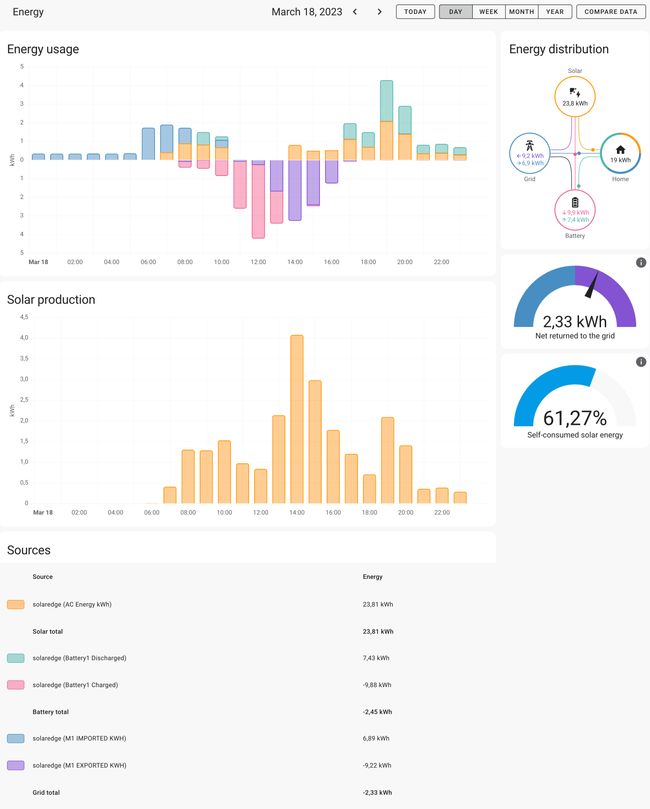
Let it run for 2-3 days and then come back. Over time, with enough data collected, you will get a very clean and informative dashboard. With the help of the “Monitor individual devices” view it is now easier to find energy hungry devices using individual monitored devices.
For an even more fine tuned configuration of the Home Assistant Energy Dashboard in combination with SolarEgde I recommend checking this thread on the Home Assistant Community.
Conclusion
#Integrating a SolarEdge inverter with Home Assistant helps with real-time monitoring and managing of our solar power system. The integration can be achieved using either the SolarEdge API or the SolarEdge Modbus integration. With live data, especially from the SolarEdge Modbus integration we can optimize your energy usage, control electricity consumers and ultimately reduce your electricity bills.
