HC-SR04 & JSN-SR04T ultrasonic distance sensors in ESPHome
In relation to my ESPHome water tank project I got a lot of inquiries about how to use an ultrasonic distance sensor with ESPHome. That’s why I created this short guide.
ESPHome is an open-source framework for building Internet of Things (IoT) devices using the ESP8266 and ESP32 microcontrollers. ESPHome provides an YAML-based configuration language for creating custom firmware that runs on these devices. There is no need to learn and code C++ to program the microcontrollers.
The sensors
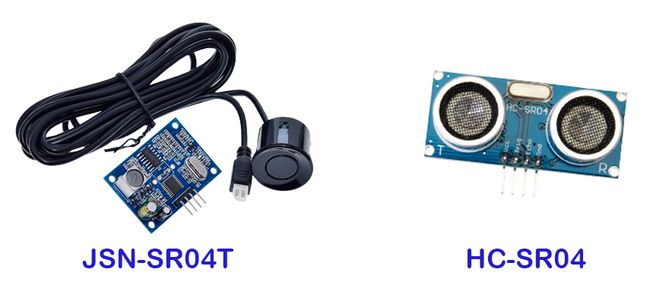
#Depending on the characteristics of your project you have two options of ultrasonic distance sensors to choose from: the HC-SR04 or the JSN-SR04T.

Both sensors are capable of accurately measuring distances between 2cm and ~400cm using ultrasonic pulses and are suitable for a wide range of projects. They both use the same principle of measuring the time it takes for an ultrasonic pulse to travel from the sensor to an object and back.
Here are a few key differences between the two sensors:
- Physical size: The JSN-SR04T sensor is larger than the HC-SR04 sensor, which may make it more difficult to fit into small projects.
- Waterproofing: The JSN-SR04T sensor is designed to be waterproof, which makes it a better choice for outdoor projects or projects that may be exposed to moisture like a water tank sensor installation.
- Cables: The JSN-SR04T typically consists of two parts: the sensor itself and a logic board. Only the sensor itself is waterproof, the logic board is not. The HC-SR04 sensor consists of only one module.
- Power consumption: The JSN-SR04T sensor has a higher power consumption than the HC-SR04 sensor. This can be a concern if you are building battery powered projects.
- Cost: A HC-SR04 sensor (~1€) is definitely the cheaper option and the JSN-SR04T (~4€) sensor is generally more expensive.
The choice between them will depend on your specific requirements, such as size, waterproofing, power consumption, and cost. While the HC-SR04 sensor can be used universally, the JSN-SR04T sensor is often the better choice for outdoor projects.
ESPHome Ultrasonic Distance Sensor
#For the following instructions, I assume that you already know ESPHome. If not, see here for an introduction to the ESPHome. It is recommended that you integrate Home Assistant with ESPHome and use the Dashboard for ESPHome. As an alternative, for non Home Assistant users, there is also the option to use the ESPHome Command Line tool.

Here are the steps to use the HC-SR04 or JSN-SR04T sensor with ESPHome:
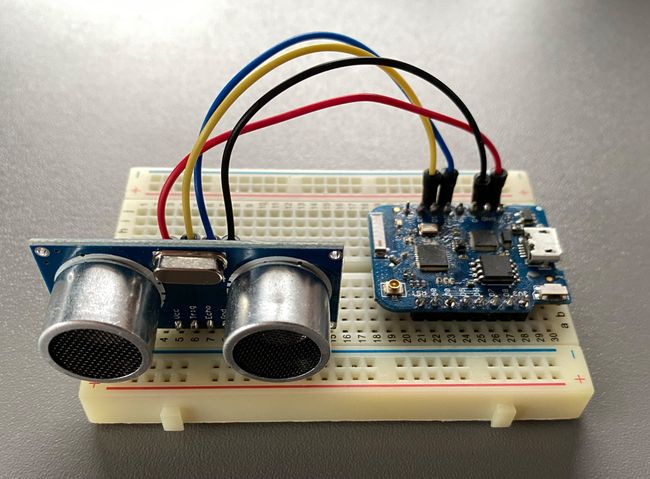
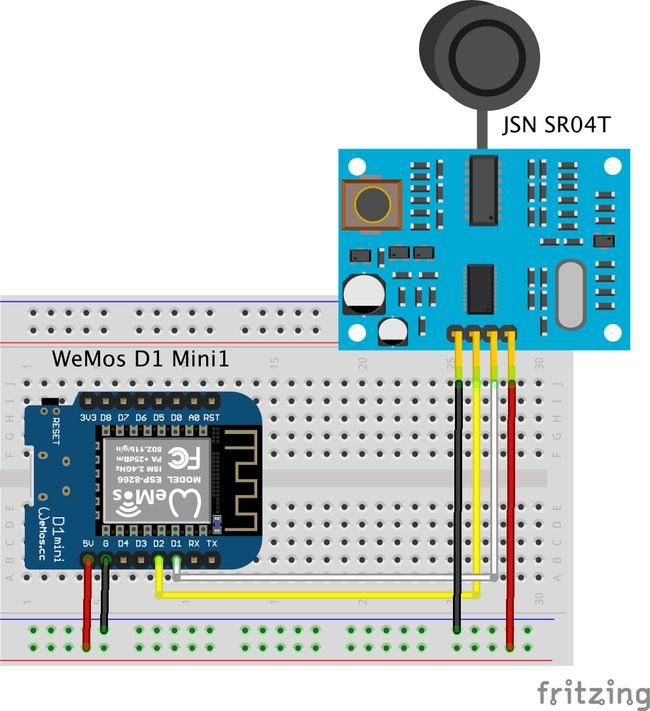
- Connect the sensor to your microcontroller. I’m using a Wemos D1 mini to illustrate the steps. Both ultrasonic distance sensors have four pins: VCC, GND, TRIG, and ECHO. Connect the VCC pin to a 5V power supply, GND to ground, TRIG to a GPIO pin (I’m using D1) on the microcontroller board, and ECHO to another GPIO pin (I’m using D2).
- Create a new ESPHome configuration file for your device. Using the Home Assistant integration you can use the ESPHome wizard. Otherwise create a new YAML file manually.
- Add the following code to the configuration file to define the HC-SR04 sensor:
sensor:
 - platform: ultrasonic
   trigger_pin: D1
   echo_pin: D2
name: 'My Ultrasonic Sensor'- Replace
D1andD2with the GPIO pins you connected to the TRIG and ECHO pins of your sensor. - Save and upload the ESPHome firmware to your microcontroller using the ESPHome web interface or the command-line tool.
- Once the firmware is uploaded and the device is connected to your Wi-Fi network, you should be able to see the distance measurement from the ultrasonic sensor in the microcontroller logs within the ESPHome dashboard or using.

That’s it! You now have a working HC-SR04 or JSN-SR04T ultrasonic distance sensor connected to your microcontroller and integrated with ESPHome.
The basic project code looks like this:
esphome:
 name: ultrasonic-sensor
 platform: ESP8266
 board: d1_mini_pro

wifi:
 ssid: 'YOUR_SSID'
 password: 'YOUR_PASSWORD'

# Enable logging
logger:

# Enable Home Assistant API
api:

# Enable over-the-air updates
ota:

sensor:
 - platform: ultrasonic
   trigger_pin: D1
   echo_pin: D2
   name: 'My Ultrasonic Sensor'
   update_interval: 1s
   accuracy_decimals: 2
   unit_of_measurement: cm
In this code, replace YOUR_SSID and YOUR_PASSWORD with your Wi-Fi network’s name and password, respectively. The platform and board options will depend on the type of microcontroller you are using. For a generic ESP8266 board use board: nodemcuv2.
Fortunately, HC-SR04 and JSN-SR04T use the same data interface. The code works for both ultrasonic distance sensors in the same way. Once running the log from ESPHome will look like this:
[14:49:45][I][app:102]: ESPHome version 2023.2.4 compiled on Mar 4 2023, 14:48:45
[14:49:45][C][wifi:504]: WiFi:
[14:49:45][C][wifi:362]: Local MAC: 2C:3A:E8:1F:60:26
[14:49:45][C][wifi:363]: SSID: [redacted]
[14:49:45][C][wifi:364]: IP Address: 192.168.30.72
[14:49:45][C][wifi:365]: BSSID: [redacted]
[14:49:45][C][wifi:367]: Hostname: 'distance-sensor'
[14:49:45][C][wifi:369]: Signal strength: -61 dB ▂▄▆█
[14:49:45][C][wifi:373]: Channel: 1
[14:49:45][C][wifi:374]: Subnet: 255.255.255.0
[14:49:45][C][wifi:375]: Gateway: 192.168.30.1
[14:49:45][C][wifi:376]: DNS1: 192.168.1.3
[14:49:45][C][wifi:377]: DNS2: 192.168.30.1
[14:49:45][C][logger:293]: Logger:
[14:49:45][C][logger:294]: Level: DEBUG
[14:49:45][C][logger:295]: Log Baud Rate: 115200
[14:49:45][C][logger:296]: Hardware UART: UART0
[14:49:45][C][ultrasonic.sensor:045]: Ultrasonic Sensor 'Ultrasonic Sensor'
[14:49:45][C][ultrasonic.sensor:045]: State Class: 'measurement'
[14:49:45][C][ultrasonic.sensor:045]: Unit of Measurement: 'm'
[14:49:45][C][ultrasonic.sensor:045]: Accuracy Decimals: 2
[14:49:45][C][ultrasonic.sensor:045]: Icon: 'mdi:arrow-expand-vertical'
[14:49:45][C][ultrasonic.sensor:046]: Echo Pin: GPIO4
[14:49:45][C][ultrasonic.sensor:047]: Trigger Pin: GPIO5
[14:49:45][C][ultrasonic.sensor:048]: Pulse time: 10 µs
[14:49:45][C][ultrasonic.sensor:049]: Timeout: 11661 µs
[14:49:45][C][ultrasonic.sensor:050]: Update Interval: 10.0s
[14:49:45][C][captive_portal:088]: Captive Portal:
[14:49:45][C][mdns:108]: mDNS:
[14:49:45][C][mdns:109]: Hostname: distance-sensor
[14:49:45][C][ota:093]: Over-The-Air Updates:
[14:49:45][C][ota:094]: Address: distance-sensor.lan:8266
[14:49:45][C][ota:097]: Using Password.
[14:49:45][C][api:138]: API Server:
[14:49:45][C][api:139]: Address: distance-sensor.lan:6053
[14:49:45][C][api:141]: Using noise encryption: YES
[14:49:46][D][ultrasonic.sensor:040]: 'Ultrasonic Sensor' - Got distance: 1.52 m
[14:49:46][D][sensor:126]: 'Ultrasonic Sensor': Sending state 1.52258 m with 2 decimals of accuracy
[14:49:56][D][ultrasonic.sensor:040]: 'Ultrasonic Sensor' - Got distance: 0.76 m
[14:49:56][D][sensor:126]: 'Ultrasonic Sensor': Sending state 0.75717 m with 2 decimals of accuracy
[14:50:06][D][ultrasonic.sensor:040]: 'Ultrasonic Sensor' - Got distance: 0.99 m
[14:50:06][D][sensor:126]: 'Ultrasonic Sensor': Sending state 0.98938 m with 2 decimals of accuracy
[14:50:16][D][ultrasonic.sensor:040]: 'Ultrasonic Sensor' - Got distance: 1.52 m
[14:50:16][D][sensor:126]: 'Ultrasonic Sensor': Sending state 1.51777 m with 2 decimals of accuracy
[14:50:26][D][ultrasonic.sensor:040]: 'Ultrasonic Sensor' - Got distance: 0.27 m
[14:50:26][D][sensor:126]: 'Ultrasonic Sensor': Sending state 0.27440 m with 2 decimals of accuracy
Advanced ESPHome configuration
#ESPHome has some powerful features that allow you to manipulate sensor values as well as automate the process of sending data before sending it to Home Assistant.
- filters allow you to pre-process sensor values like adding offset or multipliers, calibrate the output or calculate median, moving average, min, max and more
- state change events help building automations and run a lambda function on sensor state changes
Using filters
#Some handy filters that can be used in combination with ultrasonic distance sensors are:
filter_out
filters:
 - filter_out: nan
filter_out can be used to filter out specific sensor readings. For some projects the ultrasonic distance sensors can sometimes give undefined data which I would like to ignore, for example if the distance gets too large for the sensor.
median
filters:
 - median:
    window_size: 7
This filter is useful to filter outliers from the received sensor data. Using the window_size option you can control the number of values over which to calculate a moving median.
min & max
Similar to the median filter these help to calculate a min or max value based on a defined number of sensor value readings.
filters:
  - min

or

filters:
  - max
offset & multiply
filters:
 - offset: 2.0
 - multiply: 1.2
Using offset you can add a constant factor to the sensor value. With the help of multiply you can multiply each sensor value by a constant value. For the distance sensor this can be helpful for converting the units of the measurements. In order to adjust the value of ultrasonic distance sensors to centimeters and inches, they need to be filtered with a multiply filter.
calibrate_linear
filters:
  - calibrate_linear:
      - 0.0 -> 0.0
	  - 10.0 -> 12.0
With the calibrate_linear filter you get a powerful mapping tool for the sensor values allowing you to transform the measured values with an accurate “truth” source. You need to provide two ranges and a linear equation function is applied. This filter becomes handy if the sensor does not return accurate values or if you need to map the sensor values into another range.
Sensor automation
#Sensor events provide the possibility of running automations directly on the micro controller board. No Home Assistant or server is needed. The available sensor events are:
on_value
Using the on_value sensor event an automation can be triggered to run a lambda function. The function can access the sensor trigger value by using the x variable. Sensor automations are triggered after sensor filters have been applied. If filters are configured for a sensor x has already the pre-processed value.
on_value:
 then:
  - sensor.template.publish:
     id: garden_watertank_liter
     state: !lambda 'return x * 3.1415926;'
As shown in the example, a second template sensor is updated with a new value. You can also use it to toggle a light or switch.
on_raw_value
on_raw_value works similar like the on_value event, but as the name implies you have access to the direct sensor value that hasn’t passed through any filters.
on_value_range
With the on_value_range even you can run automations if a sensor value passes from outside a defined range of values to inside a range. By combining this with a distance sensor, a notification can be triggered when the sensor value exceeds or falls.
Find more about ESPHome sensor automations on the ESPHome web page. In my water tank sensor project I use some of these filters and a simple automation to update linked template sensors. The water tank sensor project utilizes a JSN-SR04T ultrasonic distance sensor to monitor the water level in our water tank. The data collected by these sensor is send to Home Assistant.
