Building a Mario Bros. Clock
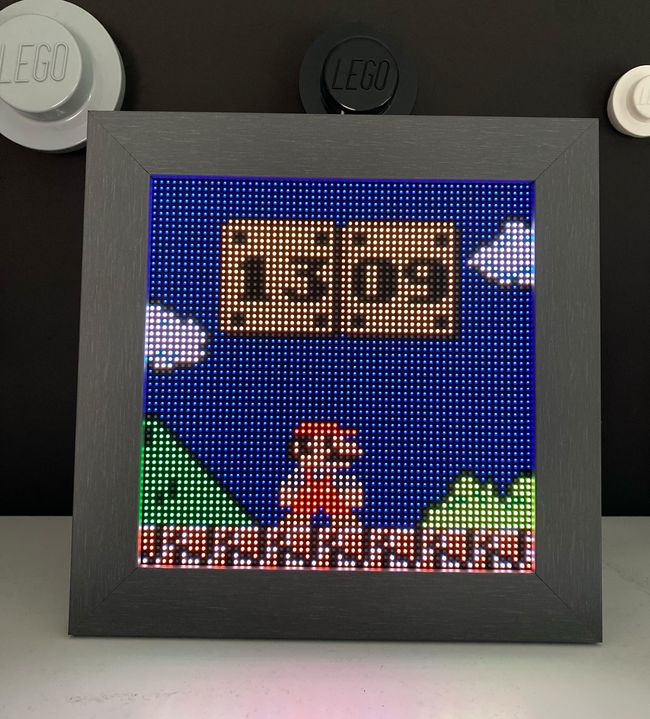
I’m a big fan of Nintendo and Super Mario since I was a teenager. One of my most played games in my life was probably Super Mario Land on the Gameboy. I still own it and an original Gameboy as well. I recently found a cool DIY project - Clockwise Mario Bros. Clock by Jonathas Barbosa. I absolutely had to rebuild it. With this project you can create your own animated Mario clock. With a nice frame it can be a retro decorative object for any environment.

Hardware
#After some research it turned out the project is relative easy to build. All you need is an HUB75 LED matrix display, an ESP32 based micro controller, some jumper wires and a 5V power supply. In addition, you need the Clockwise firmware.
If you already have an ESP32 micro controller board at hand you can use that. For an easy-to-use and integrated solution check out ESP32 Trinity. If you want to build your own PCD this project from @Alexvanheu can help you get started.
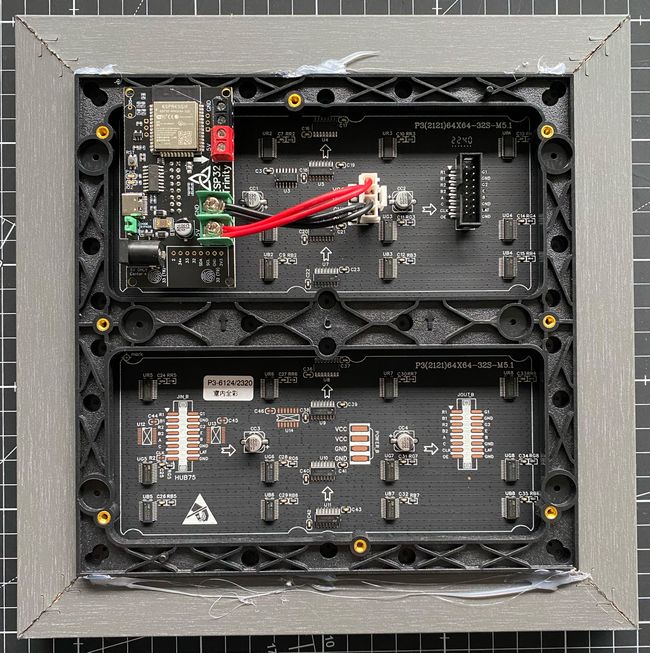
As a starting point, I experimented with a breadboard and an ESP32-based microcontroller. Wiring instructions for the display can be found on GitHub. However, I did not like all the wires and wanted them hidden behind the display. In the end I switched to the Trinity board. It can be directly plugged into the LED matrix display HUB75 connector - no wires, no soldering needed. The Trinity comes with touch sensitive buttons, an LDR to control the display brightness, display power control, 5V input and USB-C. It also makes some of the ESP32 pins available for other custom projects.

The typical 64x64 LED matrix displays you get on Aliexpress are available in different sizes. I opted for a 192mm x 192mm version. For the frame I bought a simple gray picture frame on Amazon. If you own a 3D printer you can build a custom frame or case.
To supply the clock with enough power you need a 5V power supply with enough ampere. Minimum 2A, better 3A or higher is recommended. The power needed depends on the display itself and the brightness of the pixels you select.
I use a USB-C power supply with a 2A current for powering my display. When using the Trinity board you can choose between a USB-C or a 2.1mm barrel jack power supply. Be sure to set the correct jumper on the board for USB-C power and remove it while flashing.
Firmware
#The Clockwise project page has all the clock skins available to be directly flashed from the website. There are actually five of them: of course Mario Bros. but also a text-based clock, a world clock, a Castlevania skin and a Pac Mac skin.
On the Clockwise website select the clock face you like and directly flash the firmware from within the browser. Make sure you use a browser supporting WebSerial API. Chrome on desktop works fine, Safari on Mac does not. Mobile browsers also don’t work.
To flash the firmware follow these steps:
- Go to https://clockwise.page/ and select the clockface you like
- Connect the ESP32 device to your computer’s USB port (make sure it is not powered separately yet).
- Click on the Flash button.
- Select the correct USB port the device is connected to and click on “Connect” - this depends on the operating system and browser you use.
- The installer will ask you to install Clockwise firmware - click “INSTALL” and “INSTALL” on the next screen.
- Flashing the board will take ~ 2 minutes, then you should see the installation complete message. Click “NEXT”.
- The installer will look for WiFi networks to connect to.
- Select your local network and enter your password and click “CONNECT”.
- Once connected successfully, a message with the button “VISIT DEVICE” will pop up and you can visit the clock settings page.
- On the clock settings page make sure you set the right time zone to display the correct time. The default time zone is UTC.
Attention: the time zone lookup is based on ezTime which uses timezoned.rop.nl on port 2342. If you have a looked down network, you need to unblock UDP connections on port 2342 next to the NTP protocol.
That’s it, your Mario Bros. clock is ready. If not already done, the next step could be to put the display in a stylish case or frame.
With the current firmware version 1.1.0 some additional settings can be adjusted from the device settings page: time zone, swap Blue/Green pins (depending on the display type you use), 24h time format and display brightness.
Update Dec. 01 2023
The Clockwise firmware has got a bunch of new releases since the first post. You are now able configure automatic brightness, connect a photoresistor (LDR sensor), customize the NTP server.
You can now also configure the time zone using Posix Timezone string in case the automatic time zone selection (which requires extra network ports) does not work.
The final result
#
The project is great, thanks to @jnthas.
