How to Integrate Reolink Cameras into Home Assistant
I recently replaced all our security cameras around the house with new Reolink network cameras with either Wifi or PoE (Power of Ethernet). In this post, we will walk through the process of integrating Reolink Network Cameras into Home Assistant. With this integration, you can stream live footage, set up motion detection automations, and even record clips based on events. Here is why, and more importantly, how to set up the new cameras in Home Assistant.
Why I Switched from Arlo to Reolink
#If you’ve been following my blog for a while, you know I previously wrote about my experience integrating Arlo cameras into Home Assistant. At the time, Arlo’s cameras seemed like a great option due to their robust features and seamless cloud integration. I was a happy customer for many years. However, things changed with Arlo forcing customers into a cloud subscription and service plan. Without that the already expensive cameras are super limited - IMHO they are useless. Many basic features, like accessing recordings, activity zones and certain smart alerts, are locked behind their premium tiers.
The new camera setup
#This made me start exploring more flexible, budget-friendly options that would allow local control over my cameras without being dependent on a cloud subscription. My requirements for the new setup were:
- local only, without the need for a monthly subscription plan
- enough storage for 24/7 recording (in future) or SD Card
- can be powered via power over ethernet (PoE)
- Wifi option available
- Home Assistant integration possible
- bonus points for smart object detection (person, vehicle, animals, parcels)
- bonus points for rich push notification
After checking our various options and spending hours on Reddit forums I ended up with Reolink network cameras.
Our setup now consists of 6 cameras:
- 5MP RLC-540A PoE dome camera at the front door
- 5MP RLC-520A PoE camera in the carport
- 2K 4MP CX410 camerawith color night vision
- 4K Smart Dual-Lens PoE Camerawith super large diagonal via for the garden
- 2 4K Camera RLC-810WA with Wifi 6 for the garden and pool
Reolink also offers battery powered cameras, dual view cameras or video door bells. Most of them should also work with Home Assistant, however I only could test the cameras listed above.
IMHO Reolink cameras offer excellent hardware at a reasonable price, with features like RTSP, ONVIF and even native home assistant integration, allowing me to maintain complete local control. The camera body is made of aluminium and there is a huge selection of PoE camera options. Best of all, Reolink doesn’t force you into a paid subscription to access key features, and they offer easy integration with Home Assistant for real-time monitoring, motion detection and video recording - no monthly fees.
However, not everything is perfect, and even Reolink’s cameras have a few minor flaws.
- Most models, including the one I got, are only available with a white casing. Sometimes (like the RLC-520A) the different colour models have different specifications, such as different lenses.
- There is not much room for the antenna mounts on the wifi cameras, such as the RCL-810WA models. If the bracket is very tilted, the antennas cannot be mounted due to lack of space. The solution is a short extension cable such as this one.
- Push notification in mixed languages, some cameras send notifications in German like the newer CX410 models, others only in English.
The biggest missing features are camera automation and geo-fencing, as we want to automatically activate the cameras when nobody is at home and after sunset. Arlo was much better at this. The good news is that this problem can be solved by using some automation in the Home Assistant. Finally, we only use the iOS application to view recordings when we receive notifications.
Integrate Reolink Network Cameras into Home Assistant
#In the following step-by-step guide I will walk you through how to add your Reolink cameras to Home Assistant with the native Reolink integration. There are alternative integration options, for example using the ONVIF integration or manual RTSP setup as well. However in the guide below I will focus on the Reolink integration only.
What You Will Need
#- Reolink Network Camera (with firmware that supports the Home Assistant Reolink integration)
- Home Assistant
- Reolink App credentials (admin user and password)
Step 1: Prepare Your Reolink Camera
#Before integrating the camera into Home Assistant, make sure you can access your Reolink camera via the Reolink app or web portal, and it is connected to the same network as your Home Assistant instance.
Optional: Enable the optional camera protocols
- Open the Reolink App or web interface.
- Navigate to Settings > Network Settings > Advanced.
- Ensure that features like RTSP and ONVIF are enabled just in case they are needed for advanced use cases later on (although not required for the integration).
Step 2: Add Reolink Integration to Home Assistant
#At first we need to enabled the Reolink integration in Home Assistant.
- Log in to your Home Assistant instance.
- Go to Settings > Devices & Services > + Add Integration.
- In the search bar, type “Reolink” and select the Reolink integration from the list.
Step 3: Add your cameras
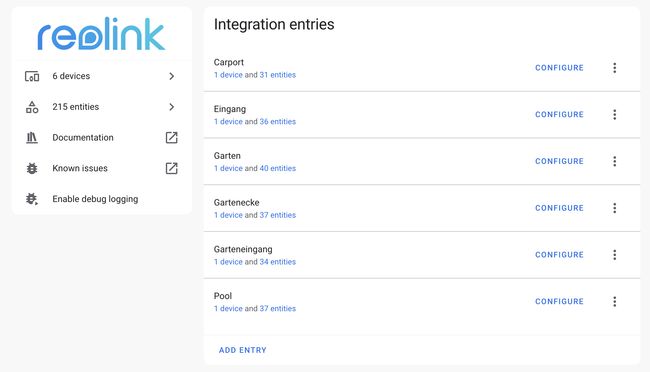
#Reolink IP cameras - cable network or WiFi connected - can be auto-discovered by Home Assistant. If an device was found, it will be shown as discovered. You can then set it up right away.
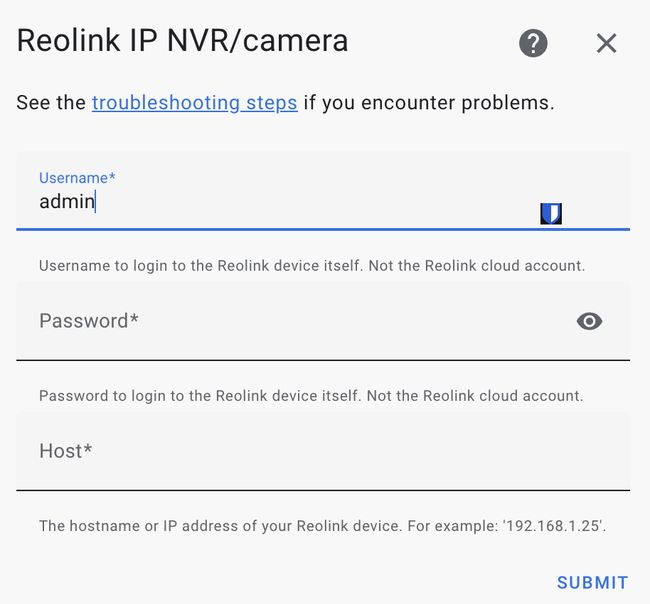
If the camera is not auto-discovered it can be manually added by clicking on Add Entry. In the following dialog enter:
- Username: Admin or another user with admin privileges set up for the camera.
- Password: Camera password.
- IP Address: The local IP address of the Reolink camera on your network.
- Once entered, click Submit.

Once configured you can change the camera protocol used by Home Assistant to communicated with the camera. You can choose between RTSP, RTMP, or FLV streaming protocol. If there are no streaming issues, lagging video etc. I recommend to leave this setting at RTSP as this should give you the best video results and is the only protocol which can stream 4K camera streams.
Step 4: Confirm the Camera is added to Home Assistant
#After submitting your credentials, Home Assistant will automatically communicate with the Reolink camera and set up the connection. If the integration is successful, you will see a confirmation message, and the camera will appear in your list of devices.

Step 5: View the Camera in Devices
#If the Reolink device view is not already open:
- Go to Settings > Devices & Services.
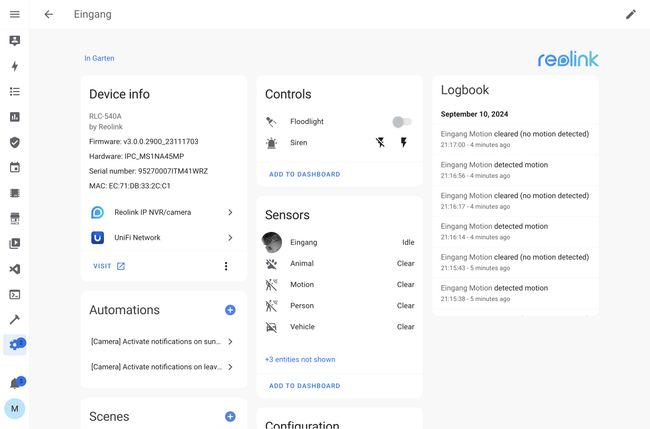
- Under Devices, you should now see your Reolink camera listed as a device. Click on it to view more information and entities that have been created for the camera (e.g., video feed, motion sensor, etc.).
Depending on the features and capabilities of the camera the Reolink integration creates 40 or more entities for each camera device. It is very verbose and detailed. All the configuration setting you have in the Reolink app are exposed as well in Home Assistant. I personally disable most of the entires in the Configuration group as I do not plan to change these from within Home Assistant. Like for other devices in Home Assistant associated automations and events are shown on the detail view as well.

I usually only keep the important switches, the camera stream(s), the motion detection sensors and a small number of configuration settings enabled.
By clicking on the round image, you should be able to access the camera’s video stream. Typically, you will first see a snapshot while the camera stream is loading in the background. Once available, the snapshot image will be replaced by the playing video.
Step 5: Viewing Your Reolink Camera in Lovelace Dashboard
#Once the Reolink camera is added to Home Assistant and you have checked the sensors and the camera stream in the device detail view, you can easily view the live video feed from your dashboard.
Go to your Lovelace dashboard.
Click on the three dots in the upper-right corner and choose Edit Dashboard.
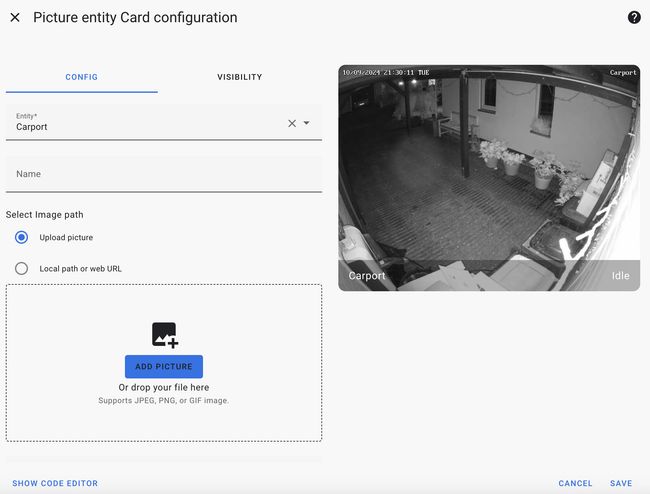
Select Add Card and then choose the Picture Entity card.
- Entity: Select the newly added Reolink camera (e.g.,
camera.reolink_front_door). - Show Stream: Toggle this option to display the live stream from the camera.
- Entity: Select the newly added Reolink camera (e.g.,

If you manage your dashboards in YAML files the picture entity card can be added via:
type: picture-entity
show_state: true
show_name: true
camera_view: auto
entity: camera.carport_fluent
Once added, you should now see the live feed from your Reolink camera directly on your dashboard.
Conclusion
#Integrating Reolink cameras with Home Assistant using the official Reolink integration is powerful and quite simple. With live streaming, motion detection automation and the ability to record clips, you can easily enhance the security of your smart home. Overall I’m super happy with the new setup and I don’t regret switching from Arlo to Reolink.
This step-by-step guide covers everything from setting up the camera to viewing the camera stream in the Home Assistant. In the next post, I’ll share some of my automations and show you how to add the missing geo-fence functionality.
Happy home automation!
