Make Your Reolink Camera Speak with Home Assistant TTS & AI
Ever wish your security camera could actually speak? Let’s talk about camera alerts and how we can make them even smarter. You’ve got your smart home cameras connected to the Home Assistant, and you get notifications whenever there’s motion. In my article Automate Reolink camera notifications, I explained how you can automate the camera notifications. That’s useful, sure. But a generic “person/car/animal detected” alert often leaves you pulling out your phone, opening the app, and waiting for the live feed to figure out what’s actually going on. More often than not, it’s just the cat from next door or the postman doing his rounds.
I wanted something smarter. I wanted Home Assistant to not just tell me that something happened, but what happened. Turns out with a little help from AI my smart home actually understand the camera feed.
The idea for this little automation is simple: when motion is detected, take a quick picture (or multiple), send that picture to an AI for analysis, and then have Home Assistant tell you the AI’s description out loud.
This guide will show you how to leverage Home Assistant with AI image analysis and Text-to-Speech (TTS) capabilities to get voice alerts and messages directly from your camera. But don’t worry if you’re using a different brand. The core method – camera event -> triggered snapshot -> AI analysis -> spoken alert via TTS – works with any camera integrated into Home Assistant that supports taking snapshots.
Here’s what you’ll need:
- A Camera: Integrated into Home Assistant and capable of taking snapshots. I’m using Reolink, but the steps for the automation part are generic.
- A Speaker/Media Player: Also integrated into Home Assistant (like a Sonos, Google Home/Nest speaker, etc.) to play the audio message.
- A Text-to-speech integration: I use Home Assistant Cloud TTS for this.
- Google Generative AI Access: You’ll need an Google AI Studio account and an API key for Gemini. We’ll cover how to get the integration set up.
You can also build this automation flow with other AI conversation integrations like Anthropic Conversation or OpenAI Conversation. I used Google AI Studio because it has a decent free tier with enough tokens for testing.
Ready? Let’s dive in.
Step 1: Get the Google Generative AI Integration Hooked Up
#First things first, Home Assistant needs a way to talk to Google’s AI. There’s an official integration for this.
- Go to Settings -> Devices & Services.
- Click + Add Integration.
- Search for “Google Generative AI Conversation” and select it.
- It will ask for your API key. You’ll need to get one from Google AI Studio (it’s free for basic use). Just follow the link provided in the integration setup or search for “Google AI Studio API key”. It’s pretty quick to generate.
- Paste your API key into the configuration and submit.
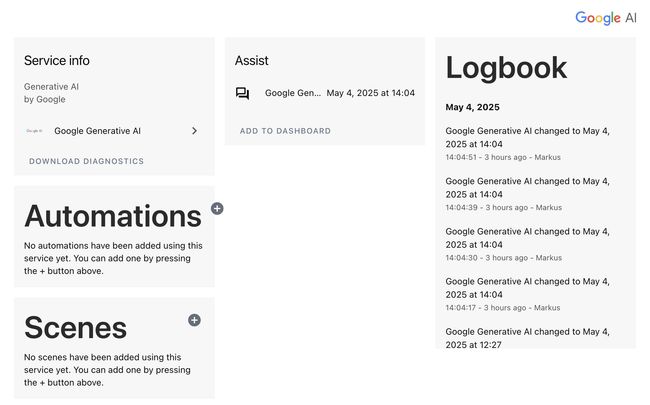
Once added, you’ll have a new service available in Home Assistant:google_generative_ai_conversation. generate_content. This is what we’ll use in the automation.
Step 2: Ensure Your AI Conversation Integration is Ready
#You can test the AI conversation agent via the Developer Tool > Actions page.
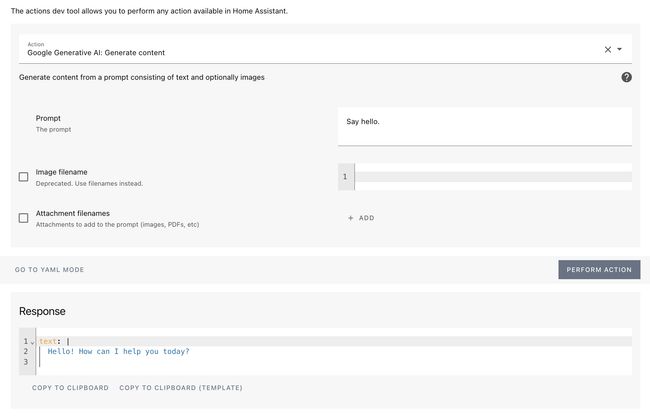
Search the Google Generative AI: Generate content integration as shown in the screenshot and fill in the form with some test questions. Then click Perform Action.
Step 3: Set up Text-to-Speech (TTS)
#The automation uses the Text-to-Speech feature to speak the response text from the AI’s analysis. I’m using the Home Assistant Cloud TTS in the example, but any configured TTS service like # Microsoft Text-to-Speech or Google Translate text-to-speech will work as well.
Make sure you have a TTS integration set up and a media_player entity ready to receive the audio. If you’re using Home Assistant Cloud, the tts.home_assistant_cloud entity should be available by default if you have Nabu Casa subscribed.
Similar like above, you can test it via the Developer Tool > Actions page.
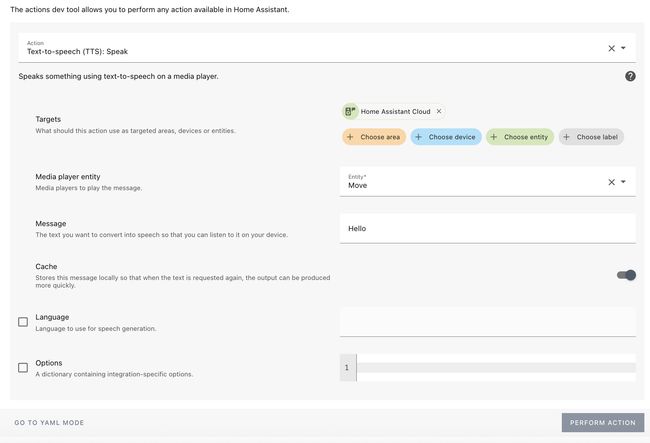
Locate Text-to-speech (TTS): Speak like in the screenshot and fill out the form. You can also select your preferred language and voice.
Step 4: Build the Automation
#Now for the fun part: putting it all together in an automation. We’ll mostly use the UI editor, which is generally the easiest way to get started. For one step, we also need to switch to YAML.
- Go to Settings -> Automations & Scenes -> Automations.
- Click + Create Automation and then Start with an empty automation.
Configuration:
#- Give it a clear name, like “Camera Motion - AI Analysis”.
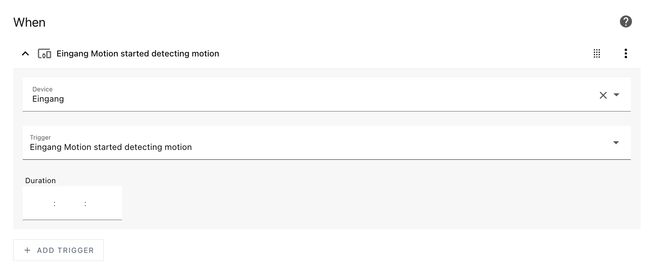
Trigger
#- Click + Add Trigger.
- Select Device.
- Choose your camera from the list of devices.
Note: This part is specific to how your camera integrates. If your camera doesn’t expose a motion binary sensor directly as a device trigger, you might need to use an Entity trigger monitoring the motion sensor’s state change. For my Reolink camera in this example, a Device trigger works. - The Entity field should automatically show related entities. Select the motion binary sensor for your camera (it might be named something like
binary_sensor.YOUR_CAMERA_NAME_motion). - The Type should be motion (see YAML below). This should be set automatically when using the visual editor.
Conditions
#We won’t add any conditions for a basic example. Click + Add Condition if you want to refine when this automation runs (e.g., only during the day).
In my example, I use a condition to run the automation only when we are at home using a simple stage condition.
Actions
#Here’s where the magic sequence happens. Click + Add Action multiple times to add these steps:
Action 1: Take a Snapshot
- Browse to and select the Camera: Take Snapshot service (aka
camera.snapshot). - For Target, select the camera entity (
camera.YOUR_CAMERA_NAME) that you want to take a snapshot of. - For Filename, you need to specify where you want to save the image. A good place is the
/mediafolder, which Home Assistant uses by default for recordings and snapshots. Set the filename to something like/media/camera/frontdoor_snapshot.jpg. You can changefrontdoor_snapshot.jpgto whatever makes sense, but remember that the/media/path is important. Home Assistant needs permission to write here, which it usually has for this path.
Tip: You can take one or more snapshots. Gemini AI can also process more images and give you a more accurate answer. However, this will require more tokens and cost more money, depending on your conversation integration and AI subscription.
Action 2: Add a Delay
- Click + Add Action again.
- Select Delay.
- Set a short delay, maybe 5 seconds. This gives Home Assistant time to actually write the snapshot file to disk before the next step tries to read it. It might not always be necessary, but it helps prevent errors.
Action 3: Send to Gemini AI
- Click + Add Action again.
- Locate and select the Google Generative AI ‘Generate content’ service.
- This service takes a prompt and can analyze camera snapshots.
- Enter the prompt: This is where you tell the AI what to do. The example YAML below has a specific, funny prompt that asks it to act like a “grumpy security officer” and answer in German. If you use this prompt, the AI’s response will be in English.
You can copy this, or write your own prompt in English (or any other language Gemini supports) if you prefer a different output. Make it specific about what you expect, ask it to briefly describe what it sees, ignore stationary objects/cars/buildings, etc. - Add a camera snapshot filename. Check Attachment filenames and enter the filename of the camera snapshot image. Make sure the filename matches the one in your snapshot action, like
/media/camera/frontdoor_snapshot.jpg.
If you are taking multiple snapshots from your camera, make sure you add all the filenames. - It is important to add a field for the response variable. This is the name of a variable that will store the AI’s response for use in later actions. The example uses
response.
Action 4: Speak the Result
Click + Add Action again.
Browse to your TTS service and select it. If you’re using Home Assistant Cloud, it’s
tts.home_assistant_cloud.For Target, select the media_player entity (your speaker) where you want to play the message.
In the message file, enter or copy the following template
{{ response.text }}.This will cause Home Assistant to switch to the YAML-based editor, as templates are not supported in the visual editor.
Your YAML should have at least three configurations: the speaker entity, the text-to-speech action and the message with the template.
Save:
- Once all actions are added, click Save in the bottom right.
If set up correctly the automation steps should look like this:

The Complete YAML
#If you prefer to work with YAML, or just want to see how the whole thing is structured, here’s my automation code. If you build yours following the steps above, it should look similar. Feel free to copy it:
alias: Front door motion detection with AI description
description: ''
triggers:
 - type: motion
   device_id: <camera devide id>
   entity_id: <camera motion sensor entity id>
   domain: binary_sensor
   trigger: device
conditions:
 - condition: state
   entity_id: group.family
   state: Home
actions:
 - action: camera.snapshot
   metadata: {}
   data:
    filename: /media/camera/frontdoor_snapshot.jpg
   target:
    entity_id:
     - <camera entity id>
 - delay:
    hours: 0
    minutes: 0
    seconds: 5
    milliseconds: 0
 - action: google_generative_ai_conversation.generate_content
   metadata: {}
   data:
    prompt: >-
     You are a grumpy security officed whatching surveillance cameras all day
     long. Briefly describe what you see in this image from my frontdoor
     camera. Don't describe stationary objects, cars or buildings. Answer
     always in German.
    filenames:
     - /media/camera/frontdoor_snapshot.jpg
   response_variable: response
 - action: tts.speak
   metadata: {}
   data:
    cache: true
    media_player_entity_id: media_player.move
    message: ''
   target:
    entity_id: tts.home_assistant_cloud
mode: single
If you copy the example below, be sure to change the placeholders. You can find these in the Automation Editor when setting up the trigger/actions, or by looking at the entity and device details in Settings -> Devices & Services -> Entities or Devices. Also adjust the trigger definition if your specific camera integration requires a different method of detecting motion (e.g. an entity state change).
Once copied, you can also switch to the Visual Automation Editor and change the parameters in the interface.
Testing and Refinement
#Save the automation and try triggering motion on your camera. With a bit of luck (and correct paths/entity IDs), you should:
- Get motion detected in Home Assistant.
- See a snapshot file appear in your /media/camera folder. You can check the stored snapshots using the Home Assistant Media Browser.
- After a few seconds, hear your speaker announce (the language will depend on your prompt!) what the AI saw in the picture, hopefully ignoring boring stuff like the wall or a parked car.
If it doesn’t work, check the automation trace logs and the Home Assistant logs (Settings -> System -> Logs) for errors related to automation, camera snapshot, Gemini service call or TTS service call. Check your Entity IDs, the snapshot filename path and your Gemini API key.
You can also play around with the Gemini prompt to get different types of descriptions or different languages. The grumpy security officer in German is just a fun idea - try writing a prompt in English for an English response.
Conclusion
#So there you have it! We’ve taken a basic camera motion alert and elevated it into a more intelligent system. Instead of just knowing that there’s motion, Home Assistant now takes a peek, asks an AI what it sees, and tells you the relevant details.
This setup, using a snapshot and an AI conversation service, isn’t limited to Reolink or even just Gemini. The concept works with any camera that can take snapshots via Home Assistant and with other AI conversation integrations you might have configured.
And honestly, integrating an AI conversation model like Gemini opens up a ton of possibilities beyond just camera analysis. You can use it to make other notifications smarter, get summaries of events, or even potentially use it as part of voice control flows. This little project just scratches the surface.
It’s always satisfying when you can make your smart home a little bit smarter and more proactive. Getting a spoken description of what’s happening outside, without having to check my phone, feels like a genuine upgrade.
Let me know if you build this or if you’ve found other cool ways to leverage AI in your Home Assistant setup!
